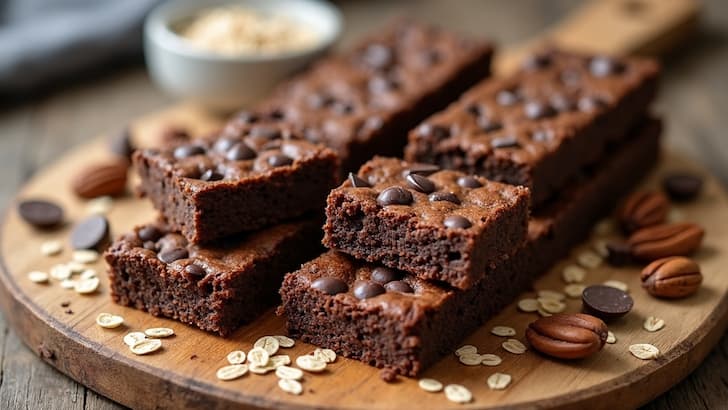
The Most Satisfying Chocolate Breakfast Bars Recipe for a Tasty Start to Your Day
There are some mornings when all I want is a chocolatey breakfast, but I don't want to settle for donuts or store-bought pastries loaded with sugar and processed ingredients. Through a lot of experimenting, I realized that homemade chocolate breakfast bars check every box for me. With just a few staple ingredients, they taste rich, satisfying, and give me a needed boost of energy right when I wake up. There's something special about starting your day with a bar that's both nourishing and full of real chocolate flavor.
What I really appreciate about this chocolate breakfast bars recipe is its adaptability. If I’m rushing out the door and need a grab and go snack or want to meal prep for my family for the week, these bars work perfectly. Plus, I get peace of mind because I know exactly what goes into each batch, so I can stay on track with my goals while enjoying a snack that feels like a treat. These have become my anytime breakfast hit that makes mornings brighter and easier, no matter how hectic they get.
Reasons to Try These Chocolate Breakfast Bars
- No fancy equipment needed. One bowl, a mixing spoon, and a baking pan are all it takes. Cleanup is a breeze, which is a huge bonus on busy mornings.
- Made with kitchen staples. Every ingredient is basic and often already sitting in my pantry. No need for specialty trips to the grocery store.
- Great for prepping ahead. These bars keep well and taste just as good on day five as they do fresh out of the oven. Meal prepping breakfasts is way less stressful thanks to this recipe.
- Balanced with fiber and protein. Oats and nuts work together to keep me satisfied, helping to avoid mid-morning hunger. I feel fuller for longer without any sugar crash.
- Customizable toppings. I love mixing things up based on what I have or what I crave week by week—think coconut flakes, sunflower seeds, or dried fruit.
Ingredients
Here’s what I reach for every time I make these chocolate breakfast bars:
- 2 cups old fashioned rolled oats
- 1/2 cup almond flour or whole wheat flour
- 1/4 cup unsweetened cocoa powder
- 1/2 teaspoon baking powder
- 1/2 teaspoon salt
- 1/3 cup pure maple syrup or honey
- 1/4 cup nut butter (peanut, almond, or sunflower)
- 1/4 cup melted coconut oil (or unsalted butter)
- 2 large eggs
- 1 teaspoon vanilla extract
- 1/2 cup chopped nuts (walnuts, almonds, or pecans)
- 1/2 cup semisweet chocolate chips
- 1/3 cup dried fruit (cranberries or cherries), optional
Step-by-Step Guide
1. Prepare the Pan and Heat the Oven
I start by preheating my oven to 350°F (175°C), making sure it's ready when my batter is mixed. I line an 8 by 8 inch baking pan with parchment paper so the bars are easy to lift out after baking.
2. Mix the Dry Ingredients
In a large bowl, I whisk together oats, flour, cocoa powder, baking powder, and salt. This ensures the cocoa spreads out evenly and keeps the bars from having any clumps or bitter spots.
3. Combine the Wet Ingredients
In another bowl, I whisk maple syrup, nut butter, melted coconut oil, eggs, and vanilla until smooth. It sometimes looks a little thick at first, but a little whisking makes it creamy and well combined.
4. Mix Everything Together
I pour the wet mixture over the dry ingredients and stir until everything is just combined. Then, I fold in the nuts, chocolate chips, and dried fruit if using. The dough will be soft and slightly sticky—just right for spreading in the pan.
5. Press and Bake
I gently spread the mixture in the prepared pan, pressing it down with the back of a spoon. If it gets sticky, wetting the spoon helps. I bake for about 22–25 minutes, until the edges set and the middle feels slightly firm when pressed.
6. Cool and Slice
Once baked, I let the pan cool for 10 minutes on a wire rack. Using the parchment paper, I lift the bars out and let them cool to room temperature. Slicing is much easier this way, and the bars don’t crumble.
Tips and Variations
- For chewier bars, I shave 2 or 3 minutes off the bake time. If I want them firmer, I let them bake a little longer.
- If I’m out of nut butter or someone needs a nut free snack, seed butter works perfectly and keeps these school safe.
- Adding coconut flakes or sunflower seeds switches up the texture and flavor for fun new batches.
- Quick oats work in a pinch, though the bars will be a bit softer. Old fashioned rolled oats give the best bite and texture.
- Sometimes, I drizzle melted chocolate on top after cooling if I want an extra chocolatey treat.
You can also try swapping in pumpkin seeds, chia seeds, or a sprinkle of cinnamon for a seasonal twist. Sometimes, adding a tablespoon of ground flaxseed boosts the fiber even more. These bars can adapt to any dietary needs or cravings, making them a true favorite in my kitchen.
Frequently Asked Questions
Q: Can I make these chocolate breakfast bars vegan?
A: Yes. Just swap the eggs for two flax eggs (mix 2 tablespoons ground flaxseed with 6 tablespoons water and let it sit for 10 minutes), and use plant based chocolate chips. Maple syrup is already a vegan choice. You'll get a whole batch of vegan chocolate breakfast bars without losing flavor or texture.
Q: How long do these bars stay fresh?
A: I keep them in a sealed container at room temperature for up to four days. If I want them to last longer, I store them in the fridge for up to a week. They freeze well too—just grab one from the freezer and let it thaw on the counter.
Q: Can I double the recipe?
A: Absolutely. For meal prepping or big family brunches, I double everything and bake in a 9 by 13 inch pan. Allow to cool fully before slicing to get neat squares.
Q: Are these bars gluten free?
A: If I use certified gluten free oats and swap in almond flour, these bars are safe for gluten free eaters. Remember to double check every ingredient if gluten is a concern in your kitchen.
Q: Can I leave out the chocolate chips?
A: Definitely. The bars will still taste chocolatey thanks to the cocoa powder, and you can simply use extra nuts, seeds, or fruit for a different flavor blend.
Share Your Chocolate Breakfast Bars Creations
Every time I bake a batch of these chocolate breakfast bars, mornings seem to get just a little bit sweeter for everyone at home. If you jump into this recipe or put your own spin on it, I’d love to see what you come up with. Share your photos or favorite ingredient swaps; homemade breakfast bars are always better with a creative twist. Here’s to many chocolatey mornings ahead!


